S’mores pie! (AKA pre-made S’mores for tomorrow)

035

Who doesn’t LOVE S’mores????

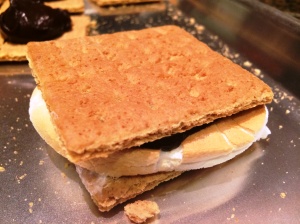
Have you been to Blaze Pizza? They serve amazing custom ordered personal pizza for a dirt-cheap price but most importantly, they also sell ready-made S’mores! Of course, I had to try to make it myself…how hard could it be right? Honestly, it was easy!

Blaze Pizza most likely uses McVitie’s Digestive Biscuits for that crunchy on the outside, soft and chewy on the inside finish but I used traditional graham crackers.

End result? Delicioso!

For the melted chocolate finish, all I did was quickly make ganache.
If you want them crunchy on the outside and soft on the inside, use the biscuits, if you enjoy the soft and chewy combo, use graham crackers. Delicious either way!

I think I prefer this to freshly made S’mores since the marshmallow cools down and becomes chewy, the ganache is already soft so it’s not like I get a piece of unmelted chocolate.

Ingredients: Makes 2 cookies
4 graham cracker squares (2 sheets)
2 giant marshmallows (cut in half)
1/2 bar of your favorite dark chocolate (think 1/2 of Hershey’s bar)
1/2 bar of your favorite milk chocolate
3/4~1 cup half and half (adjust as needed)

Guide:
Melt chocolate with half and half in a small pot over low heat. Stir constantly. Let it cool until it hardens.                                                              *Will chill fast in the refrigerator or freezer.

Place marshmallows on a baking sheet and broil for 2 minutes or until golden brown.

033

Place a tablespoon full of ganache (or a more) on one side of the cracker/biscuit, place 1 piece of roasted marshmallow on the other half.

Put them together, squeeze, and you can eat it immediately or let it cool and enjoy it the next day!

034

Israeli Couscous with Enoki, Parmesan and Lemon-Truffle Vinaigrette

031

Addicting pasta gems!

I apologize for my hiatus. A lot has happened where I am now happily single again. I will not bore you with the details so on to my favorite topic…food!

LAX has made the best change ever to their Delta terminal (T5) recently. Lemonade moved in! Lemonade serves seasonal So Cal comfort food and some of their items like the Israeli couscous, wild mushroom, parmesan, lemon-truffle vinaigrette (that’s just one item) is uh-mazing! I travel often so when I travel with Delta, I make sure to stop by and get a container full of these little pasta guys to eat on the plane.

Ingredients: Serves 6 ish as an appetizer
1-2 pack of enoki mushrooms (stems cut off and rinsed)
4 Tbs extra-virgin olive oil
pinch of sea salt
pinch of black pepper
2 cups Israeli couscous
2 cups chicken broth (or veggie broth for a vegetarian dish)
1/2 cup lemon-truffle vinaigrette (see below)
1/2 cup shaved parmesan cheese

Dressing: Makes 1/2 cup (mix all ingredients)
Juice of 1 lemon
6 Tbs canola oil
1 Tbs extra-virgin olive oil
1/8 tsp white truffle oil
1/2 tsp sea salt
1/4 tsp black pepper

Guide:
Preheat oven to 400 degrees.
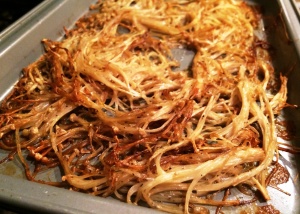
Place the mushroom on a baking sheet, drizzle with oil, sprinkle sea salt, pepper then toss. Roast them in the oven until it turns brown and caramelized (20 min)

023

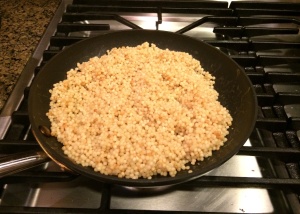
On a large skillet, toast the couscous over medium heat until they are golden brown. (5 min)
Pour in the broth, cover and simmer until tender. (10-12 min)

021

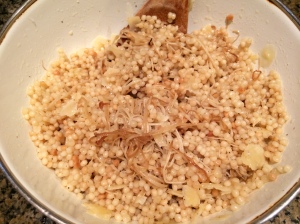
Once the couscous cools down, mix couscous, mushrooms, dressing and parmesan cheese in a bowl.

029

Serve room temp. or cold and enjoy!

~~~

Keep in refrigerator for up to 3 days or so. Ingredients won’t go bad but the couscous starts to harden over time.

Jamaican Style Oven-baked Chicken

JA Oven Baked Chicken
Crispy yet moist chicken – BAKED!

I missed my extended Jamaican family so I pulled out an old-school Jamaican recipe by Enid Donaldson and made my own version (really, just different ratio of ingredients) of the oven-baked chicken.

Ingredients: Serves 2-4 (depends on how much you eat)
3-4 lb chicken thighs with or without skin (also can use breast, legs, etc.)
4 cloves of garlic
2 stalks green garlic (or 1 stalk scallion – white and green part)
1/2 tsp dried thyme
2 Tbs vinegar
3 tsp salt
½ tsp sugar
1 tsp poultry spice mix (or your choice of dried herbs)
1/2 tsp black pepper
2 Tbs butter or margarine – melted
½ cup ketchup
½ cup evaporated milk
1 cup panko (bread crumbs)

Guide:
Finely dice garlic cloves and green garlic (or scallion). Mix garlic and green garlic along with vinegar and thyme in a container or plastic bag large enough for the chicken and the vinegar mix to marinade. Combine chicken with the vinegar mix and marinade for 10 min.

Take the marinated chicken out into a separate container large enough for the chicken. Dump the vinegar mix and discard. Flavor the marinated chicken with salt, sugar, herbs (of your choice), and black pepper.  Mix ketchup, evaporated milk and melted butter and combine with marinated chicken. Marinade in this pink sauce for at least 30 min. (I marinated overnight)

Preheat the oven to 350 degrees.

Take the marinated chicken out and pat  dry-you don’t want it to be too wet or else the breadcrumbs will get too moist and lose that crispy texture. Lay the skin side of the chicken (or either side if skinless) into the panko and place the chicken breaded side up on a greased pan. Sprinkle or spray the top of the chicken with a little bit of oil.(I used pam spray)

Bake for 45-1hour. Serve warm or cold.

~~~

*Why I don’t bread both sides – When baking, the juice from the chicken oozes out and  gets absorbed by the panko and gets too gooey on the bottom.

*If you pack this for lunch, your cubicle neighbors will for sure smell the garlic!

Collard Greens con Yolky Eggs

First time working with collard greens!

I cooked it just like I do with kale and it came out yummy! The eggs somewhat neutralizes the bitterness.

 
Ingredients: Serves 2 as a side dish
1 bunch collard greens – rinsed well, leaves torn off of the hard center stems

2 Tbs olive oil

5-7 cloves or garlic – smashed and peeled

pinch of sea salt

pinch of black pepper

Squeeze of fresh lemon juice (1 wedge)

4 eggs

Guide: 

Wash leaves, rip the green leaves off the ribs and remove stems – basically just want the green leaves) – Tear them up into large pieces.

Heat a medium-large sized pan, add oil and garlic cloves, heat over medium high heat.  (make sure you don’t burn the garlic – will become semi bitter)

Add greens to the pan, sprinkle salt and pepper and stir occasionally until greens are wilted.  Overdoing it will lose the bright green color.

Squeeze  lemon juice, remove greens from the heat and set aside.

Cook eggs to your liking and mount it on the greens. (I prefer over easy)

~~~~~

Serve it with a buttered toast and coffee. It’s healthy and delicious!

Baked Stuffed Peppers


Too easy you say? Yes, extremely easy and delicious.

Thanks for the peppers Lori!


Ingredients: Serves 2 as a side
4 small bell peppers (green if you like crunchy, yellow if you like semi crunchy.)
½ cup meat sauce (I used my leftover turkey meat sauce)
Handful shredded mozzarella cheese

 
Guide:
Preheat the oven to 350 degrees. Line the baking sheet with aluminum foil.
Cut the top off of the bell peppers, remove all seeds and veins carefully not to puncture or break the peppers. Stuff them with some meat sauce; top it off with a good amount of mozzarella cheese.
Bake for about 15-20 minutes until cheese is slightly burnt and peppers are tender.

~~~
If you want to keep the peppers crunchy but melt and burn the cheese, increase heat to 400 and reduce baking time. (Keep your eye on it so it doesn’t over burn)

Mini Zucchini Brownies

Perfect little squares.  Just enough chocolate and nuts.

(I must admit, I was busy making zucchini muffins so my sister Steph did most of the work)

I love sweets but nothing too sweet. I like frosting but only if they’re not too sweet. My friend Calvin makes fun of me and my sisters because we always say “Mmm, this is good! It’s not too sweet!”. So very true. Hahaha.

I found this recipe on-line somewhere and swapped out oil for butter. This brownie is just moist enough,  just sweet enough with just enough crunch. It goes great with a cup of soy latte.

Ingredients: Makes about 32 mini brownie squares
1/2 cup unsalted butter – melted
1 1/2 cups white sugar
2 teaspoons vanilla extract
2 cups all-purpose flour
1/2 cup unsweetened cocoa powder
1 1/2 teaspoons baking soda
1 teaspoon salt
2 cups shredded zucchini
1/2 cup chopped walnuts

 
Guide:
Preheat the oven to 350 degrees. Grease and flour 2 mini brownie pans.
In a small bowl, mix butter, sugar, vanilla. In a large bowl, mix flour, cocoa powder, baking soda, salt. Combine wet into dry. It will get pretty tough to mix but it’s ok. It’ not supposed to look like the regular brownie batter.  Fold in the zucchini and walnuts and divide evenly into the prepared pan.
Bake for 15-20 minutes (depending on the size of brownies) – Until brownies spring back when gently touched.
Take them out of the oven; let them sit for 2 minutes before moving the cookies onto a cooling rack.

 
~~~

If baking in one big pan, bake for 25-30 minutes.
Store them in an airtight container for up to couple days – room temp

Moist Zucchini Muffins


Talk about moist muffins! They taste very similar to carrot cake muffins!

My friend Lori gave me a BUNCH of zucchinis she grew in her backyard. I only had a few days before leaving for my business trip so I had to come up with a clever way to use them all before they go to waste! I grilled a couple but what to do with the rest. I KNOW, make yummy muffins out of them!

I found a zucchini muffin recipe on-line but it called for a lot of oil and sugar so I changed it up to what I felt was appropriate to my liking and they came out amazing!

Our home smelled like Thanksgiving was already here (nutmeg and cinnamon) and my boyfriend and his colleagues enjoyed devouring them the next morning. Of course I packed a few for myself to take on the flight.

Ingredients: Makes 24 muffins
3 1/4 cups all-purpose flour
1 1/2 teaspoons salt
1 teaspoon ground nutmeg
2 teaspoons baking soda
3 teaspoon ground cinnamon
1 cup sugar
1 cup light brown sugar
1/2 cup butter – melted
1/2 cup apple sauce
4 eggs – beaten
4 1/2 cups grated zucchini (do not squeeze out the water)
3 teaspoons vanilla extract


Guide:
Preheat the oven to 350 degrees. Spray muffin pans with PAM (baking) if you have one to prevent sticking.

In a large bowl, combine all dry ingredients (flour, salt, nutmeg, baking soda, cinnamon, white and brown sugar).

In a medium bowl, combine all wet ingredients (melted butter, apple sauce, eggs,  zucchini, vanilla extract).

Mix wet ingredients into dry just until they’re well combined. Using an ice cream scoop, scoop them in the muffin pans and bake them for 30 minutes or until toothpick comes out clean.

Take them out of the oven; let them sit for few minutes before moving them onto a cooling rack.

~~~

You can add pecans or walnuts in the batter if you’d like for an extra crunch!

To store, once completely cooled, store them in an air tight container at room temp up to couple days.


Crispy and Chewy Chocolate Chip Cookies


Crispy on the outside, chewy on the inside!

This morning at 5:40am, I was woken up by my foster dog Alfie. He wanted to be let out so I grabbed him along with our dog Mo(hawk) and stepped outside. The air was so chilly that it woke me right up. I contemplated on going back to bed, but the sun was up, I wasn’t tired or anything, so decided to bake cookies! WHY NOT.

I remember reading a basic cookie recipe in “Savory Sweet Life: 100 Simply Delicious Recipes for Every Family Occasion” by A.Currah. Like she has in her title, it was so simple that I didn’t have to dig the book out again for the recipe.

Well, after 30 minutes in the kitchen, our house smelled like a cookie factory. Then I contemplated on what to do with 3 dozen cookies…keeping them all at home would be a BAD IDEA…
I decided to set some aside for my family, then split the rest in half for my colleagues and my boyfriend’s colleagues.

We don’t have any cookies left at home…which means I get to bake something new again! YAHOO~!

Ingredients:Her recipe says 4 dozen, but I made mine so big that I got 3 dozen
1 cup butter (2 sticks unsalted butter) – room temp
½ cup granulated sugar
1 ½ cups – dark brown sugar
2 eggs
2 tsp – pure vanilla extract
2 ¾ cup all purpose flour
1 ½ tsp baking powder
1 tsp baking soda
¾ tsp – finely grounded sea salt
2 ¼ cup semi sweet chocolate chips

Guide:
Preheat the oven to 360 degrees.

Using either a hand mixer or a standing mixer, mix butter and both sugar on medium for 3 minutes or until fluffy. Add an egg at a time and continue to mix. Add in vanilla extract.
Slow down the machine to add flour, baking powder, baking soda and sea salt until combined.
Add in the chocolate chips and stop the machine once they’re equally distributed in the mixture.

Line 2 baking sheets with parchment paper. Scoop 2 Tbs worth of dough and place them 2 inches apart from each other. Bake for 11 minutes or until you see the corners turn golden brown.

Take them out of the oven; let them sit for 2 minutes before moving the cookies onto a cooling rack.

~~~

Below picture is a good example of what NOT TO DO if you want round cookies.

If you want round cookies and not square ones, I urge you to bake them in 2 batches (2 sheets at a time).
I’m known to be impatient with these things and tend to overcrowd my sheets…so of course today’s cookies came out SQUARE. Still, most importantly, they tasted amazing!


Caramelized Roasted Beets


Beets beets beets. What to do with beets besides juice them in the juicer? Roast them!

Ingredients:
3 medium sized beets
2 Tbs olive oil
1/2 – 1 tsp finely ground sea salt
1 tsp fresh thyme – chopped

Guide:
Preheat the oven to 475 degrees.

Scrub the beets clean of any dirt (you’re not going to peel them).
Chop off ½ inch on the top and bottom to get a clean base.
Use a mandolin and slice them thin (5mm) very carefully, or slice them using a knife very carefully.
Toss them in a bowl with olive oil, salt and thyme.

Line 2 baking sheets with parchment paper, lay the beets flat making sure they’re not overlapping each other too much to ensure even roasting. Pop them in the oven for 16-18 minutes. Once time is up, put the baking sheets on a cooling rack and let them cool for few minutes. You’re done!

~~~

Roasted beets caramelize and come out very sweet. They go perfect in a salad that uses vinaigrette dressing (something zesty or tart).

Addicting Tacos!

I love Mexican food period. You take the simplest ingredients and turn it into something so delicious! It wasn’t taco Tuesday but we broke the rules and had tacos on a Monday!

The amazing adobo marinade recipe is from “Truly Mexican” by Roberto Santibanez.
The yummy corn recipe is from “Fast, Fresh & Green” by Susie Middleton.

I have no shame in making other people’s recipes! I usually add my own twist to things but when it’s already good as is, I will share it with you as is.

Ingredients:  Makes around 7-8 tacos (yes we load them up)
Flour or corn tortilla – grilled or heated on a pan
Marinated flank steak – grilled, then sliced into bite size pieces
Chile and lime corn sauté
Cilantro – chopped
Avocado – sliced
Salsa
Queso fresco or mild feta cheese
Lime – cut into small wedges

Guide:
Assemble all the taco ingredients on the tortilla, fold up and INHALE your taco!

Ok, so that was obvious. Here are the recipes for the marinated flank steak & chile and lime corn sautee.

Ingredients for marinated steak (with extra marinade to save for later):
2lb flank steak – cut into 3-4 big pieces
Pasilla-guajillo adobo marinade: Makes 3 cups (recipe asks for Pasilla chiles but I used New Mexico chiles)
6 dried New Mexico chiles – wiped clean, stemmed, slit open, seeded and deveined
8 guajillo chiles – wiped clean, stemmed, slit open, seeded and deveined
¼ cup Distilled white vinegar
¼ cup light Mexican beer (I used Dos Equis)
½ cup chopped white onion (I only had brown ones and that worked just fine)
4 large garlic cloves peeled
1 tsp fine salt (or 2 tsp kosher salt)
½ tsp dried oregano (preferably Mexican)
¼ tsp cumin seeds (or scant ¼ tsp cumin powder)
5 whole cloves (or ½ tsp ground cloves)

Guide:
Heat a pan on medium-low heat and toast the chiles in batches. (just so you don’t over crowd your pan)
Turn them over frequently until the chiles are fragrant, about 1 minute per batch.
Soak the chiles in enough cold water (not iced) to cover until they’re soft, about 30 minutes. Drain and discard the water.

Combine everything in a blender and blend until completely smooth. Add water if necessary but you shouldn’t need it.

Take ½ cup of the adobo marinade; rub it all over the flank steak. Store it in an air tight container in the fridge over night (or at least 2 hours).

Take the flank steak out of the fridge 15 minutes before putting it on the heat.
Heat the grill on medium high heat, throw them babies on and grill it to your preference.
Take the steaks off the grill, let it sit on a plate for 5 minutes so the juice redistributes evenly.
Slice them into bite size pieces and you’re done!

~~~

The abodo keeps in the fridge for up to five days, or in the freezer for up to a month.
Ingredients for corn chile and lime sauté (great side dish):
2 Tbs unsalted butter (cut in half)
1 Tbs extra virgin olive oil
1 medium brown onion – diced small
1 tsp kosher salt
2 heaping full cups of fresh corn kernels (2 big corns)
½ tsp ancho chile powder
1 tsp finely zested lime (1 lime)
Freshly ground black pepper
¼ lime
3 Tbs chopped cilantro

Guide:
Melt 1 Tbs of butter and olive oil in a pan over medium-low heat.
Add the onions, sauté until translucent. Once the onions are translucent, crank up the heat to medium-high and brown the onions. Add salt and corn to the pan and sauté for about 5 minutes. Make sure to scrape the bottom of the pan to get all the good brown stuff. Add the chile powder and stir. Turn off the heat, add the lime zest, black pepper, and squeeze the lime juice then stir again. Mix in cilantro right before serving.

~~~

My boyfriend Chris mentioned it’s like eating a Mexican style corn on the cob without the mess (that we usually make).

when you can't stop at one…

Tiny Perfect Bites

Enjoying the domesticated lifestyle in Southern California

cheletopia

Just a girl in this world...

WordPress.com News

The latest news on WordPress.com and the WordPress community.